Wednesday, August 31, 2011

It floats

When I got up this morning and saw it was a nice sunny day, I knew there wasn't going to be any postponement of the launch.

There was a minor problem when I put the kayak on top of the car. Because it's a lot narrower than the other kayaks we use, it doesn't really fit the Thule Hullaport Pro carrier. It didn't feel secure enough for me, so I turned the kayak upside-down and layed it flat on the roof-rack. It actually works out well, since it means we can carry two kayaks on the roof.


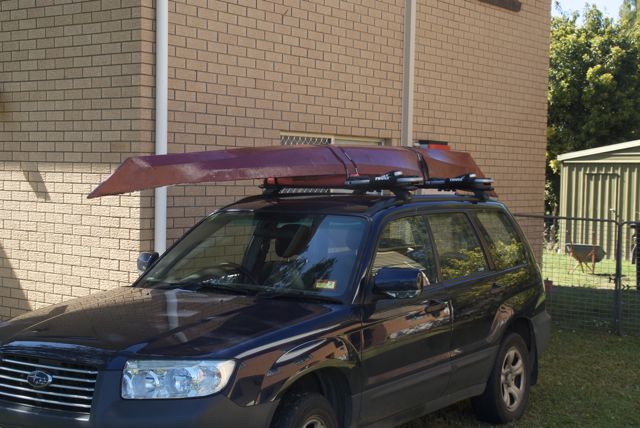
Because I neglected to put any kind of handle on the stern of the kayak, there was nowhere to hang a safety flag, so I just put it up back-to-front and hung the flag (a red lanyard from the UNE zoology department) from the paddle strap on the bow.

Note the blatant plug for Redlands Kayak Tours on the sticker.


When we arrived at Thompson's Beach we were actually surprised at how high the tide was. Until I got out of the car, I was a bit worried there wasn't going to be enough beach for me to take any photos. The last time I paddled there, a couple of weeks ago, we had to carry or drag the kayaks about fifty metres to the water.


Photo shoot over, I didn't waste much time in donning my skirt and PFD and getting the boat into the water. As you can see in the next photo, I used my paddle as an outrigger to stabilise the boat as I got in. Luckily the batteries in the video camera needed charging, so there's no footage of the boat tipping the other way as I was half way in and nearly depositing me in the water.


Finally, I was afloat and in water deep enough to paddle properly. As you can see from the next picture, she sits pretty high in the water, higher than I'd expected, mainly because my 60kg weight doesn't push it down much.


What these pictures don't show is just how tippy the boat is. Let's just say it was an exciting first paddle. I've heard a lot of people say, and I agree with them, that you can get a nice stable kayak and grow out of it with experience, or get one that's a challenge to paddle, and grow into it. I'm looking forward to growing into this one, because she zips along in the water and, being so light, is pretty maneuverable as well. I don't know if that maneuverability means it won't track well, I didn't paddle it for long enough in a straight line. I do know I'm going to have fun getting used to it.


Experienced kayakers will probably look at the next photo and assume I'm turning to starboard by edging the kayak and using the paddle as a stern rudder. They'd be right about the stern rudder, but the lean to the left is my hips getting a great workout as I wobbled from side to side.


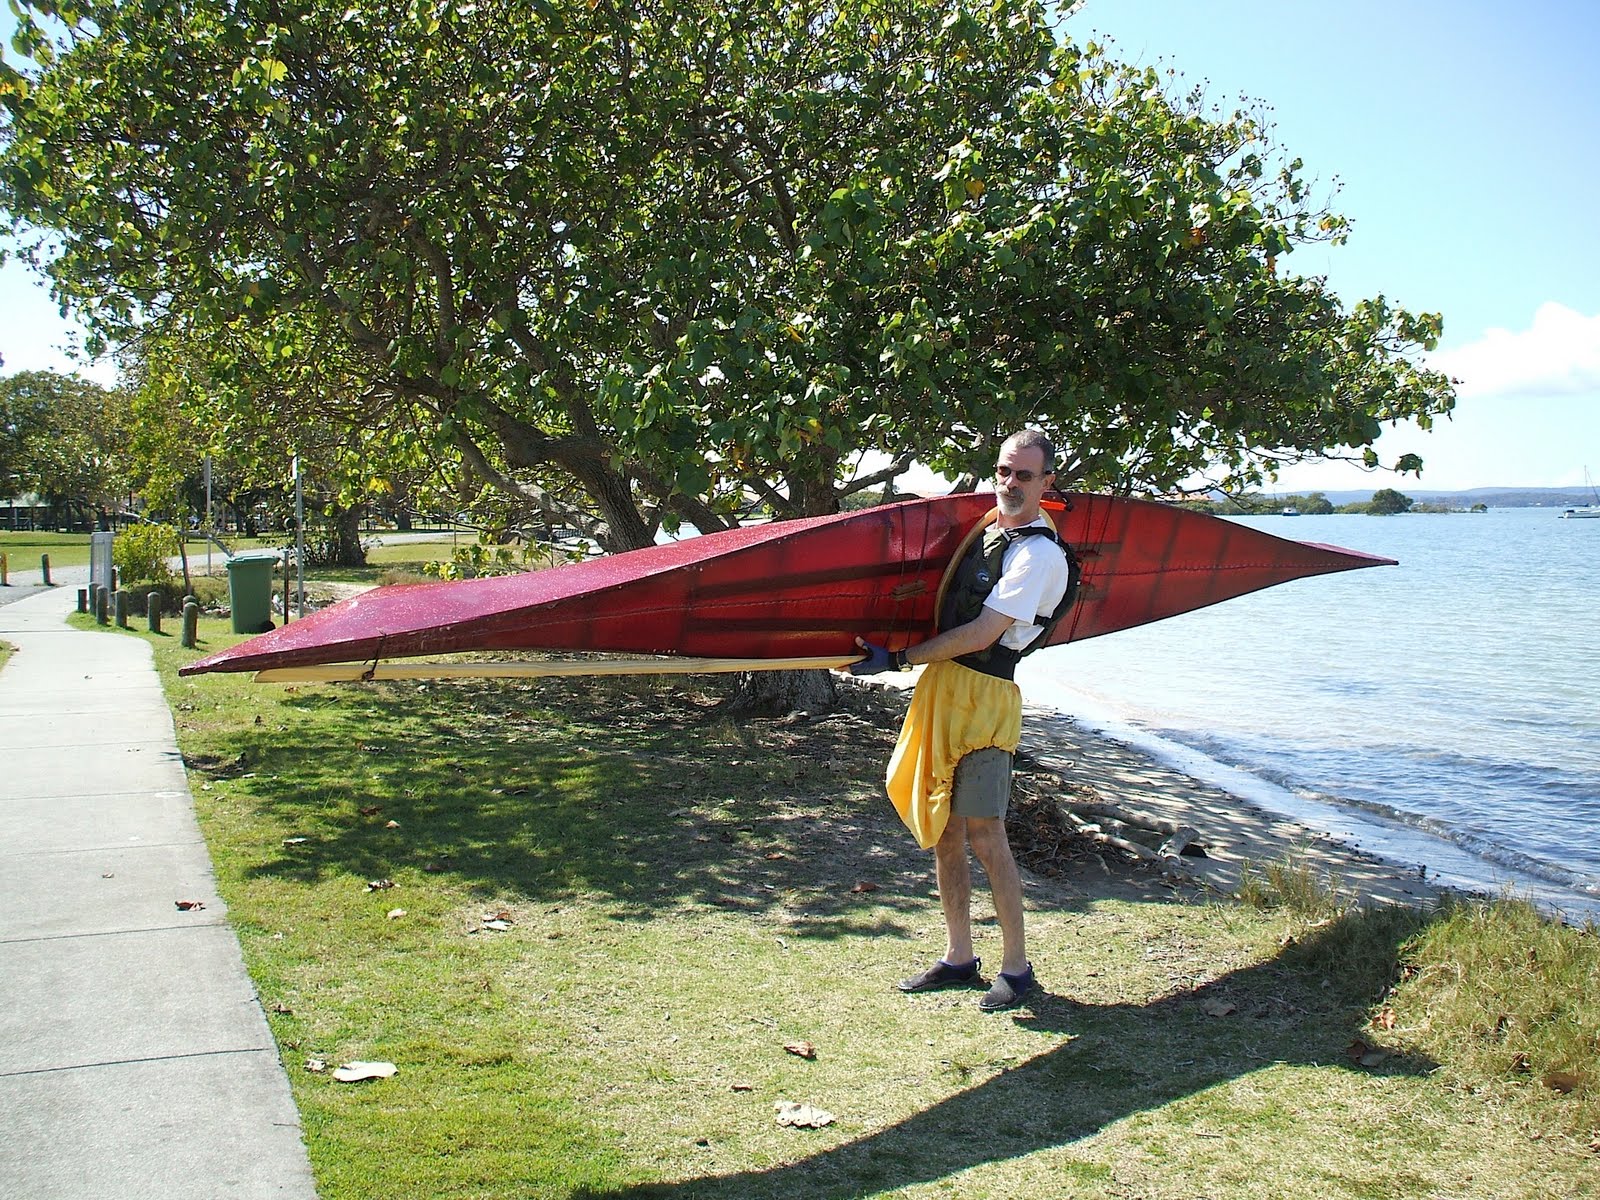
This is the first kayak I've ever paddled that I could actually pick up with one hand. When Donna put this photo on Facebook, she made me delete my comment about having the "weirdest boner right now". I can't help thinking my shadow looks like a well known statue near Newcastle in England.


Now that it's a real kayak and it's had its bum wet, it qualifies to come out of the shed and live in the garage with Tony's Nantucket.


Next time I take it out, I'll be putting a sheet of closed cell foam inside to make it easier for me to slide in and out. It'll also make it a bit easier on my ankles, since the ribs won't be sticking into them like they did today. I also need to work out how to stop the dye rubbing off onto my shirt from the inside of the coaming. It might just be a case of giving it a bit of a wash to get rid of any dye that's left. If I had any goop left I'd give it a coating of that, but I used it all up finishing the deck.

Monday, August 29, 2011

Decklines

I fitted the decklines today, so there's nothing else I can do now but put the boat in the water and take it for a paddle. The deck hasn't completely dried yet, it's still a little tacky, but I figured it's dry enough to fit the decklines and get it outside for some pictures.

It's sitting in the shed now with a piece of rib stock slid under the lines and over the coaming to keep them clear of the deck so they don't stick.

I've always thought I was pretty good at tying knots. I proved it today by tying off the decklines behind the cockpit one-handed. I also couldn't see what I was doing, so had to do it by feel. The ones in front of the cockpit weren't so bad, since I had enough room to get both hands in there.

The decklines took a little longer to do than I'd thought, but not much. The problem was, I had trouble locating the holes I'd predrilled in the frame for the line on the bow. I ended up having to refer to some photos I'd taken before skinning, then I shone a torch from the other side once I knew roughly where they were.


If you look closely in the top right corner of the next picture, you can see my neighbour Mike, admiring my handiwork.


So, would I do it again? Hell yeah! There's a few things I'd do differently though.

For a start, I'd save a bit of money on materials by ripping the gunwales and stringers, etc, myself, rather than buying them cut to order. Cunningham's book has an explanation on how to rip timber using a normal circular saw, rather than a bench saw. The reason I didn't do it last time was I didn't have a bench saw, nor Cunningham's book.

Mick, from Flat Earth Kayak Sails, recommended bamboo for the ribs. Not only would it be cheaper than the oak I used, but it's a lot easier to bend, so would save me a lot of time and frustration.

Although I had no problems with the brickie's twine I used for lashing, I'd use the artificial sinew next time. It sits a lot flatter than the twine and results in less bumps in the skin. Cutting notches in the gunwales isn't really enough to overcome that.

I think I'd prefer to try the methods in Cunningham's book as far as shaping the gunwales, etc. Using windlasses and cutting deckbeams to a certain angle, hoping they would fit right once you tighten everything, is a bit hit and miss. Using forms to hold the gunwales then cutting the beams to fit looks a lot better. I think bending and fitting the ribs before fitting the keelson will result in a lot less shims.

Lastly, I'd give myself a lot more time to finish off the skin, now that I've got the hang of applying the goop. I'd be tempted to leave the skin undyed too. If you do a decent job on the frame it's a shame to cover it up too much. Oh, and I'd round off the edges of deckbeams 5 and 6, the ones just in front of the cockpit a bit more. They aren't a problem now the boat is finished, but they were like speed bumps when I was applying the goop.

If you've been following this blog and thinking about building a kayak yourself, go for it. It can be frustrating at times, but overall it's a very rewarding experience. It's also a bit addictive. I can highly recommend checking out some of the links in my sidebar too. There's lots of helpful advice and inspiration from other people that have built their own kayaks.

Sunday, August 28, 2011

It's finished! or day 24

We ended up not going to the boat show. As Donna said, there's no kayak stuff, it's all boats and engines. So we spent a bit of time putting the roof on a flight aviary for the wild lorikeets we rehabilitate, then I got stuck into gooping the deck.

I'd highly recommend you mix small batches of Corey's Goop and take your time applying it. The results will be much better. In hindsight, the hull doesn't look crap, it just has an excess of character. I must admit too, I've never actually seen anyone else's home built skin-on-frame kayak up close, so I don't really know what they're supposed to look like. I've seen plenty of pictures of them, and it's easy to make them look perfect in a photo.

Anyway, here's a few pictures of mine looking pretty close to perfect (although those ribs look pretty wonky).


There's a few drips on the deck from when I did the hull yesterday. I can't help thinking they'd look really cool if I could get someone to paint bear paws around them.


To avoid any more runs, Donna and I sat in the shed for a while and babysat the boat with a Merlot and, in my case, cigar.

These pics were taken by Donna and they're the first ones where there's actually been a person in them to give it a bit of scale.

Looks pretty sleek doesn't it?


The reason for the silly expression in the next photo was, I was trying to decide whether to have the wine up to my lips, or the cigar when Donna took the photo, she caught me doing neither.


Aah! All done. I still have to fit the decklines, but they aren't necessary. Once the goop has dried it's ready for launch. At the moment, that'll be on Wednesday, since Donna is off work then. High tide is around 11am, so I can launch off a nice soft, sandy beach. Actually, at low tide I could launch off a nice, soft muddy beach, but I don't want too much yucky stuff in my new boat just yet.


When I started building the kayak, I'd always put on some shoes to protect my feet. A couple of weeks ago I was looking at some photos online of a kayak building school in Norway. One thing that stood out was the number of people wearing sandles with socks. Apart from the fact you wouldn't be caught dead like that in Australia, you wouldn't be allowed into a class without proper enclosed foot-ware either. After a while though, I got sick of putting shoes on to go and work in the shed, so I did most of the work dressed as I am in the above pictures. I should mention that I did manage to drop something heavy on my big toe a couple of weeks ago that resulted in my second lot of blood-letting during the build.

I think that was another 2 hours today, taking the total to 80 1/2. The deck lines will take about 10 or 15 minutes to fit. If anyone asks, it took me about 80 hours to build, but you could do it in about 60.

The only timing I'm doing now is the countdown to launch.

Day 23, Goop

I put the goop on the hull yesterday and I've got to say, I'm a bit disappointed. If you look at the next three pictures, it doesn't look too bad. There's some cloudy patches where I've put it on a bit too thick, but they're actually the better spots.

It's not a problem with the product I used, more I think the fact that I chose to apply it on a humid (rainy) day and didn't give myself enough time. You really need to babysit the boat after you've applied the goop, to get rid of the inevitable runs. I had to go to work, so I couldn't do that and there are runs aplenty. As far as the integrity of the hull is concerned, I don't think there'll be a problem, it should be waterproof. I just looks crap.

That said, most people will see the deck more than the hull, especially when it's in the water. I'm thinking the deck will be a lot easier to do and I can take a lot more care with it.


If you look closely at the right of this next picture, you can see the finish isn't as smooth as it should be. Most of the hull is like that. The cloudy bits are caused by carbon dioxide bubbles forming as a part of the chemical reaction in the goop. If the goop is only thin, then the bubbles can escape to the surface, if not they stay. I actually think it doesn't look too bad where it's cloudy, at least the finish is smoother there.


It actually looks quite good in this next picture.


This is what a lot of the hull looks like though. It's as though it needs another coat to make it smooth, except there are already three coats on it. If I have enough goop left after doing the deck, I may apply another coat on the hull in some of the rougher spots. It won't bond as well when you apply it to a dry coat. When you put it on wet-on-wet it chemically bonds, if it goes onto a dry coat it's only a physical bond, so it won't be as strong. It might still improve the looks though. I'm wondering how a coating of surfboard wax would go once it's finished too.


I'll hopefully do the deck tomorrow, the hull is still a bit tacky at the moment, so I'll give it more time to dry before I turn it over. The Brisbane boat show is on today, so we're off to that soon.

That was about 2 hours of work yesterday, taking the total to 78 1/2.

Thursday, August 25, 2011

Day 22, so close to finishing

I must admit, dyeing the boat was a bit more nerve wracking than I'd expected.

After reading the instructions a couple of times, where it says to mix a litre of water with an ounce of the powder, I weighed the powder I had and found there was only half an ounce of it. The website where I ordered it said there should be enough to dye a boat the size of mine (about 16 feet), but I thought I'd make sure before I mixed it.

I emailed Elroy who has just finished building the same kind of boat and got his nylon and dye from the same place, and he confirmed that half an ounce, mixed with half a litre of water is indeed enough for the whole boat.

So this morning I got everything ready, put on an apron and some pink rubber gloves and started dyeing. The reason I found it nerve wracking was that by the time I got past the cockpit, about two thirds of the boat, it was starting to look like I was going to run out of dye after all. Well I did have enough, but only just. I suspect the towel I was using as a brush may have soaked a lot of it up and a foam brush, or smaller piece of towel might have been better. There's also a few drops of it on the ground and on the saw horses too. The shed looks like someone's been bleeding in there, which is a bit of a worry since there was a police car and an ambulance parked across the road for a while this morning. I have no idea why.

The colour I chose was russet, which is a kind of reddish-brown. It looks almost maroon at the moment, but that should change once it's dried and the poly-urethane has been applied. It'll probably fade a bit and look more weathered after a while too. I'm told the Goop tends to yellow a bit after a while.

Once the dyeing was finished, I used an old iron to shrink the fabric. The instructions on the skinboat school website say to just shrink the deck and only do the hull if you feel it needs it. I decided to do the hull as well. There are a couple of patches where the iron was in one spot for a bit longer than it maybe should have been, but I think that gives it a more authentic look than it would if the whole thing was completely even.


The dyeing and ironing only took me about an hour and there's nothing else I can do on the boat now until the dye has dried properly. I'll probably leave it till Saturday before I tackle the next step. That way I can get Donna to help out and I'll be sure the dye is dry.

That's 76 1/2 hours. I wonder if I can finish it in under 80.

Tuesday, August 23, 2011

Day 21 and it's now a boat

The good thing about sewing on the skin, as long as you haven't cut off too much material, is that if you aren't happy with how it looks, you can undo the stitches and redo them. I wasn't happy with the way the bow looked, especially after I sewed up the stern, so I undid the stitches about half way and resewed, taking out some more slack. It's still a little wrinkly on the deck, but the hull is flat, and hopefully when I dye and shrink the skin, some more of those wrinkles will come out.

After doing the first row of stitches fore and aft to get the skin nice and tightish, I cut off the excess and did another row of stitches. I think they call it a blind stitch, since if you do it right, you don't actually see the stitches. This bit made me nervous, not the sewing, but the cutting. If I got too close to the first row of stitches when I cut, I wouldn't have enough to sew. It's worth leaving a little more than you think you'll need, since the excess is tucked underneath when you sew and you'll end up with neater stitches.


Here's an example of what fairly neat stitching looks like. The stitches at the top are the initial running stitch, used to take out all the slack and basically hold the skin on the boat. The other stitches are the blind stitch that hides all the excess.


Below is a less attractive bit of stitching. Because I had less excess here and not a lot of room to work due to the narrowness of the deck, it's a lot more bumpy and uneven. That said, I don't mind it. As I told my neighbour, it gives it an authentic look.


Once that lot of sewing is done it's time to fit the coaming. There were two things that concerned me here. The first was that when I cut the skin to size I'd be going through the seam I'd just sewn down the middle of the deck. I was a bit worried it'd all come undone, but it turned out not to be a problem. The other concern was that I'd get half way through sewing in the coaming and the strap I was using to hold it down would slip, allowing the coaming to move. I had three more straps I could have used, but they were all in the car and the car was at work with Donna.

As it turned out, the strap didn't move. I would recommend two straps though, for piece of mind. I'd also recommend you take care with placement of the straps, otherwise they cover up the holes in the coaming and make it really interesting when you're trying to sew.

I like the way there's now a slight curve in the coaming with the tension on it.


As I cut the cloth to size I put 40mm finishing nails through the holes to hold it in place. The only trouble with using the nails is they made my fingers dirty and they also left black marks where they'd been through the cloth. On the plus side, this made it easier to find the holes when you removed them and sewed.


Coming to the end of sewing the coaming was a bit like finishing a long race. I could see how many holes I had left before the whole thing was finished. Once I got there and tied off the thread, that was it, the actual building of the kayak was done.

There was a satisfying thunk as I loosened off the strap and the coaming ring sprung back to take the tension of the skin it was sewn to.

It's now a kayak.


All that remains now is to dye it and coat it in Corey's Goop, then fit the deck lines. I'm hoping it'll be on the water in about a week, the following weekend at the latest.

The last lot of stitching took about four and a half hours. It's amazing how time flies when you're having fun. 75 1/2 hours total time.

Monday, August 22, 2011

Kayak Build, Day 20, the afternoon shift

After my earlier blog entry I thought I'd take it easy, fix the kitchen tap that's been leaking for ages, maybe do some more work on the aviary that's half built next to the house, feed the birds, more importantly, read another chapter of "Insect Plant Biology" by Schoonhoven, et al, for uni. I only have one subject left to go to finish off my science degree.

But no, there's a heap of wood in the shed with nylon draped over it, alluringly, just waiting to be turned into a boat. Its siren call was irresistible, so I spent a couple of hours sewing.

I should mention here that I've heard a lot of SOF kayak builders mention to their wives that traditionally it was the wives that did the sewing on Inuit kayaks. Traditionally, modern day SOF kayak builders wives, when told this, say naughty words. Donna is very traditional, she said a naughty word. She did however sit and watch me sew, which is heaps better than standing there by yourself on your lonesome. I did mention the other day that she's going to be doing some of the work on her kayak when I build it. I'm not sure if that's sunk in yet.

Anyway, below are a few pictures of the front part of the skin sewn. After I'd done this part of the job, taken a few pictures, locked up the shed, had a drinks and a cigar and started cooking dinner because it was my turn tonight, I mentioned to Donna that some people have a problem with getting a straight line when they sew the skin on their kayaks. I really think it depends on the method you use. I know my stitching wasn't straight, and it didn't need to be, since this row of stitching was mainly to pull the skin tight, but it looks pretty good to me. I'm really hoping that the next stage, after sewing, will pull the wrinkles out. I read in a forum recently that the best way to build a Greenland kayak is to follow Chris Cunningham's instructions in his book, but when you get to the skinning stage, follow Corey's instructions on his website. The link is on my sidebar under skinboats.org and I recommend you read the whole website.

The instructions I was using to build the frame tell you to sew from the pointy bits toward the cockpit, Corey's instructions say the opposite and I've seen advice elsewhere that says the same thing, start at the cockpit. I don't know which is best, but since I bought the material from Corey and I was following his sewing videos, I figured that sewing in the direction he suggested was a good idea.

One thing that intrigued me once I'd done this part of the sewing was that I've seen examples of people sewing their skin on where the seam was all over the place. I know my sewing wasn't that straight, but the result at the end looked pretty good. Keeping in mind that this row of stitching is just to tension the skin and the next lot is to tidy up the excess cloth, I'm surprised at how good it looks. I suspect that people that have trouble getting a straight seam on their boats are using a different technique. Not that their way is wrong, I think a crooked seam on this type of boat will look just as good as a straight one. In fact, I think a straight seam would look out of place on a Greenlander.

Anyway, here's a few pictures of my effort at skinning the front end of the boat. As you can see there's plenty of wrinkles. I'm hoping they'll disappear when I get to the dyeing and shrinking stage. There's also an obligatory, inside-the-boat picture that all SOF builders show. I'll also be posting similar pictures once the skin has been dyed.


I think the picture below needs a bow-tie. I recall being best man at a friend's wedding in a shirt that looked like this.


Considering my stitching seemed to be all over the place, this looks pretty straight. At least the skin sounds like a drum when you tap it, and that's the main thing.

The excess will be trimmed and another row of stitching done before it's all dyed, then coated with poly-urethane, in this case, known as Corey's Goop.


Two more hours on the job this afternoon, that's 71 hours total. I should mention that my times on the job are getting very guesstimated, if that's a word. I'm really putting times on here because people ask the question, how long does it take to build one of these? And because I'm curious myself how much It's taken me. Another question I get asked is, how much would it cost to buy one? So working out how long it takes me to build the boat and multiplying that by a labour cost of $20 an hour (less than what I get for filling shelves in a supermarket) gives me an idea of what my boat is going to be worth.

Sunday, August 21, 2011

Sewing, or day 20

There's lots of information available online about sewing the skin on a kayak, but not a lot on sewing leather seats into them. The best information I was able to find was this video, and it's similar to the method I used.

I used two needles and a piece of artificial sinew about four times the length that I need to sew. In the picture below, you can see half of the thread hanging down below the seat. To do a stitch, I push the needle through just like you would a normal running stitch.


Below is the view from... well... below.


Pull the needle through and make sure both ends are tight. The good thing with the artificial sinew is you can let the needles dangle like this and they don't usually fall off.


Take the second needle and push it up through the hole that the first needle came through.


Once you've pulled it through and made sure again that both ends are tight, just repeat until you get to the end.


With the smell of leather and wood, and the sound of Don Burrows playing jazz on the stereo in the shed, I couldn't resist lighting up my pipe.

A pipe and a comfy chair, what more could a man want?


And the frame is officially finished.


This is what six yards of ballistic nylon looks like. I remember having to roll my bedding up like this when I was in the air cadets as a teenager.


After finding the midpoint of the cloth, it's layed out along the hull and a pocket, about four inches long, is sewn at one end to hold it in place. You then you slip it off, go to the other end of the boat and you have two choices. You can either a) pull the cloth to take out the slack, then make a mark about four inches in from the end and sew there, or b) pull the cloth as thight as you possibly can, make a mark at the point where the end of the boat is and sew there.

I got a little confused at this point and ended up combining both methods. After lying on the ground with one foot against a deck-beam, much to Donna's amusement, I made a mark in the right place and sewed the second pocket from that point in about four inches. Then I rolled up some of the cloth for a better grip, put my foot against the deck beam and pulled with all my might. The boat was creaking and occasionally lifting off the sawing horse at the other end, I was grunting and straining, and I still couldn't get the pocket over the end of the boat. I decided I was going to have to remove a few stitches, that's when I realised what I done wrong. It's not really a pocket you need to sew the second time, just a few stitches to hold the cloth in place. Once it's there you can let go and sew in a pocket.


Below is the first pocket on the bow of the boat, once I'd got the cloth pulled tight and sewn on at each end, and the boat was turned up the right way.


I then got out my soldering iron and cut off the excess material. In this last picture I've only removed the excess from one side. It was getting way past my lunch time, so I though I'd take a break. Incidentally, the soldering iron is only a cheap 45w one, but it did the job okay once it'd heated up properly.


Once I've trimmed both sides it'll be time to start the first line of stitches down the centre of the deck. I think I'll refresh my memory on the technique by reviewing Corey's instructions a few times first though.

Another 3 hours today, that's a total of 69 hours. I should do up a spreadsheet listing how long it takes for each part of the job, although I have seen one online already. I'll see if I can find it again and post a link to it.