Sunday, July 31, 2011

Kayak Build, Day 10

The day I'd been dreading arrived, rib bending day.

I decided to try one rib yesterday afternoon, after I got home from work. The ribs had been soaking for a couple of days, so I figured I'd see how I went with it. I had all the ribs numbered, so I thought I'd try rib number 13 first, that way I wouldn't feel so bad if it didn't work properly, and if it did, I'd feel more confident with the rest. There's also the fact that rib 13 is closest to the middle of the boat and so has the gentlest bends.

Well it didn't turn out. The main reason was not enough heat. I could only get the steam box up to 75C (167F), which isn't enough. Part of the problem was the camp stove I was using was struggling, it would boil the water, but only just. That improved when I put another gas canister in. Putting a styrofoam box around the steamer also helped, but I could still only get the temperature up to about 93C (199F). That's probably hot enough, but as soon as you take the wood out of the steamer, it starts to cool.

So I called it a day and did a bit more research on steam bending ribs. The general consensus on the QajaqUSA forum is that soaking the wood is a complete waste of time, since it'll take months for any moisture to really soak into the wood. It really comes down to the heat. You need to be able to get the wood up to boiling point, or very close, and bend it while it's at that temperature.

The best way to get the wood to boiling point was to actually stick it in the boiling water, so that's what I did.


After a few failed attempts I finally managed to get a decent bend, as you can see from the next couple of pictures.


The trick is to keep the wood in the steam while you're bending it, and to bend it slowly. If you rush it you'll end up with a kink in the wood, and splinters. The splintering in the picture below isn't too bad, it hasn't really weakened the rib. Once it was dry and had cooled down, I shaved that part off with a 1" chisel. That part of the rib is slightly thinner than the rest, but some of the ribs are a little thicker than they should be anyway.


Because I can't get the whole rib into the boiling water, I found the best way to do each rib was one side at a time. I'd bend one side, clamp it to the gunwale and keelson, then when it had cooled I'd boil the other side and clamp the whole thing to the gunwales.


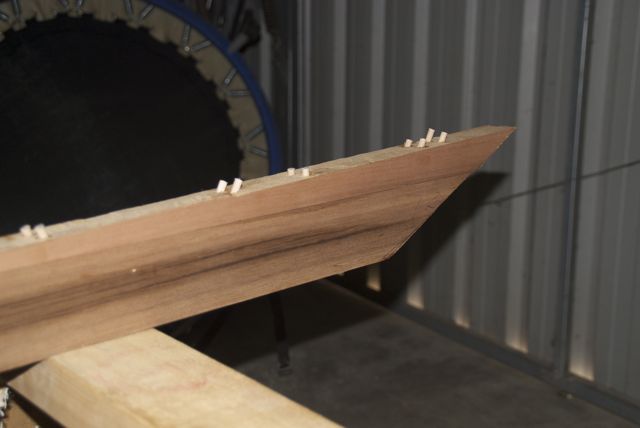
I found I was still getting some ribs breaking though, or at least splintering so much they weren't really useable. The reason for that is the grain in the material. If you look closely at the next picture, you can see the grain follows the bend in the wood, because it was straight to start with.


In the next picture, you can see where the grain doesn't quite follow the length of the wood, it's at a slight angle, and where that grain comes to the surface is where the rib is going to split.

This means I'm going to have to buy some more rib stock and be really choosy with what I buy this time.


The next two pictures show some of the ribs after bending, already cut to length and fitted into the mortises. I think there's five of them finished. The only reason I haven't done more today is the gas ran out on the camp stove. We have an old gas barbecue I could use to heat the water, but I can't find the hose for it. I have about eight more ribs to bend that should bend okay, then I just have to buy the material for the rest.


Once all the ribs are in place, they get lashed to the keelson, then the hull stringers are fitted and also laced to the ribs. That will be the hull finished, then there's just a couple of jobs to do on the deck and the coaming to bend and it'll almost be ready to skin.

I lost track of how much time I spent on the job today, since we had a visit from Donna's parents, but I'm guessing it was about three hours, which takes the total to 36 1/2 hours.

Friday, July 29, 2011

Kayak Build, Day 9

The ribs are now cut to length and soaking. The original three were being weighed down in the water by a metal partition from some supermarket shelving that had been thrown out. Years of muck had accumulated on the metal work and it was all starting to come off and turn the water a horrible colour, as well as marking the wood, so I decided to find something else to weigh it down. What do you use to weigh something down in water? More water of course, in a plastic bucket, naturally. See, the two semesters of physics I did at uni wasn't wasted.


Due to my lack of forward planning with the ribs, I was determined not to do the same with the coaming. The coaming also needs to be soaked and bent, but it needs a to be bent around a form. We just happened to have an offcut of kitchen bench top from when we had our kitchen renovated a few years ago, better still, it was just the right size.

Now, the coaming is slightly longer than it is wide, by about 2 inches, so I couldn't just get a compass and draw a circle, nor did I want to do it freehand and end up with a lopsided coaming. What I did was mark out the centre of the form, offset it by about an inch either side, then use a piece of leftover wooden venetian blind as a compass. I was quite pleased with the way it turned out.


The finished form looks pretty good, I hope the coaming does too.


No more work on it today since I have to work again this evening. I thought I was getting the evening off since I'm working all day tomorrow, but there was no-one else available, so my poor back is getting a rest for a couple of hours. If you're wondering what I do that I get time to build a boat during the day, I'm a filler in the dairy section of a supermarket. That means a minimum of three hours heavy lifting. I'm milk boy tomorrow morning, so that's three hours of lifting 18kg milk crates, then four hours of filling the dairy and freezer load. Years of hunching over a desk in my previous job is coming back to haunt me now.

Anyway, that's another three hours on the build today, taking the total to 33 1/2 hours. I think I've gone over the $400 mark with materials too, as the oak I bought from Bunnings last night was more expensive than I thought. One thing I've learned from this project is how to do it better and cheaper next time.

Thursday, July 28, 2011

A bit of a miscellaneous day

In the absence of enough rib stock I thought I'd do a few miscellaneous jobs on the kayak, stuff that I don't really count as being part of the build, so I won't add to the total time, except for a bit of sanding and cleaning up the ends of dowels.

Below is my steam box that'll be used for bending the ribs. It's made from a piece of 2.4m by 1.2m half inch ply and probably took me no more than two hours to make. Underneath that popcorn tin is a gas, camping stove, one of those you can buy in just about any supermarket. The tin is filled with water, and the steam goes up through a two inch hole in the bottom of the steamer.


The ribs will be placed on the two dowels, allowing the steam to circulate to all surfaces. Yes, I know they aren't square, that's because I measured from the bottom of the steamer and the steamer isn't square. It was a cheap piece of ply that'd sat in the bottom of someone's trailer for months and got wet.


I mentioned yesterday that the only thing I had to soak the ribs in was our bath tub, then I had a proper look around the house. As well as a fish tank and a wheelbarrow that were big enough, I also had three huge photographic developing trays that are just the right size. I decided to start soaking the ribs that I already have so I can steam them on Sunday. I'll buy the rest of the rib stock tonight after I finish work as it's late night shopping tonight. I can then cut them to size and start soaking them tomorrow.


Since it's such a nice winter's day outside today, I thought I'd take some pictures of the frame out in the sun. Finding a spot in the garden without chook or dog poo isn't easy, but I managed.


One problem I have every morning when I start working on the kayak is that the chooks want to come in the shed and explore. Invariably they'll leave a calling card right where I'll step in it, so it comes in handy having Chino, my step-daughter's dog, handy. She likes to lie in the shed doorway, in the sun, which keeps the chooks out.


With the half hour spent today sanding, I'm now up to 30 1/2 hours total. Leather for the seat and deck lines was bought on eBay yesterday. It all still looks like coming in at well under $400. Some of the material I've bought for it will be left over, so it'll be used on Donna's boat. So I won't be able to work out the exact costing till it's all finished.

Wednesday, July 27, 2011

Kayak Build, Day 8

I've got the evening off work today, so I could spend a bit more time on the kayak than usual. The only trouble is, I've run out of materials.

When I last bought timber, I only bought one length of 8mm Tassie oak for the ribs. The reason for this is, 6mm is recommended, but they didn't have 6mm, only 4mm or 8mm. So I figured I'd get the 8mm and see how easy it was to plane to the right thickness before buying more. Well I've got to the stage where I'm ready to start on the ribs. The piece of 8mm was very easy to plane to thickness, so I need to go and buy some more. Except, I don't have the car.

Anyway, here's a picture of the finished pointy end. Or at least finished to the point it's ready for the ribs to be fitted. The curve that's been cut out of the stem piece is just to reduce weight a bit, not that it'll make that much difference.


The next two pictures show the three ribs I've cut to length so far. There's twenty-one ribs all together, so I need to get about six more pieces of oak. These are the three longest, so six should be more than enough. You may remember that I originally cut enough mortises for twenty-two ribs. Well the forward most one is so close to the stem piece that I wont be able to put a rib in there, so it'll be left empty.


Once all the ribs are cut to length, they need to soak in water for three days to soften them up, then into the steamer for five minutes before bending. I've had a look round for something that's long enough to soak them in, and the only thing I can find is our bathtub. We only use the shower, so it won't be any inconvenience to leave it full of water and oak strips for three days. I might check a couple of forums first though to make sure it's not going to stain the bath.

Total on the job is now 30 hours, since I only spent two hours on it today. I've heard 60 hours mentioned as a total build time, so I've reached the half way point. Although I suspect it's not going to take me another 30 hours to finish.

Tuesday, July 26, 2011

Kayak Build, Day 7

I had thought of using the electric planer to plane the tops of the gunwales. There's a slight problem there though, the gunwales curve. This means that each end of the planer will be touching the gunwales, but the blade wont be. So, I used the block plane instead. Good old hand tools.

Once the planing was done, I turned the boat upside down and started on the keelson. The instructions say to use three temporary spacers to hold the keelson in place, one on the first deck beam of 8", one at deck beam seven of 5" and one at deck beam eleven of 4". It also says the distance between the top of the keelson and bottom of the gunwales should be 10" at the bow, 7" in the middle and 6" at the stern. I got a little confused by this, since I was still thinking of the boat being the right way up, so those distances would basically be the distance between the keelson and the gunwales. I just cut the spacers to the sizes mentioned and ignored the other measurements.

The next two pictures show the keelson temporarily lashed in place. There's a slight curve in it from stem to stern. If I'd made it completely straight, the finished boat would paddle in a straight line very easily, but would be almost impossible to turn, so you need a bit of rocker.


Once the keelson is in place the stem and stern pieces are cut. I made a bit of a miscalculation in cutting out the stem piece, so it became the stern instead. I'd recommend getting a stiff piece of cardboard and making up a template when you're doing the this part. It will be a lot easier than trying to line up a 5 1/2" board and mark it, unless you have someone helping you. I'll be using a template to do the stem piece, if I can find a decent piece of cardboard. I work in a supermarket, so that shouldn't be hard.

The stern piece was cut to shape using a jigsaw. Cutting a 3/4" thick piece of Western Red Cedar with a jigsaw is a lot easier than cutting a 1 1/2" piece of pine with the same tool, so this went fairly quickly.

Once it's cut to shape, it's then clamped in place and more drilling and pegging is done. The end of the keelson will be cut flush with the end of the stern piece. As you can see from the next picture, I've probably put one of the dowels a little too far back, as I'll be cutting right through it.

The stern piece is then lashed to the gunwales. More sore fingers.


It looks straight at the moment, but I haven't run a string line along the keel yet to see if it really is straight. I don't want a boat that will keep wanting to turn in one direction, unless I'm paddling in a strong crosswind all the time. That said, the Greenland kayaks don't have much freeboard (hull above water), so they tend not to weathercock as much as some boats that I've paddled.


Tomorrow the stem piece will be fitted, then it'll be time to start on the ribs. The instructions say to use 6mm thick ribs, the material I have is 8mm thick, so I'll have to plane it to the correct thickness first. This'll be the fun part, since a lot of first time builders have trouble bending the ribs to shape. Once the ribs are in place though, the frame won't be all that far off being finished.

That's another three and a half hours on the job today, taking the total to 28 hours. I would have liked to spend more time on it today, but I have to go to work soon.

Monday, July 25, 2011

Kayak Build, Day 6

Well, sort of. It's more like day 6, 7 and 8, but if I'd blogged each day you would have got bored, since I was doing the same thing each day.

Saturday, after Donna and I finished our boat course, I spent an hour and a half removing nails one at a time and replacing them with dowels. Once the beams were pegged they were lashed using brickie's string, or mason's twine if you don't live in Australia. I did the same thing for an hour and a half yesterday, after we'd spent the day fishing on Donna's sister's 42' cruiser in Moreton Bay. A boat that Donna's brother-in-law built himself. Today I spent another three and a half hours doing the same thing before going to work. Pegging and lashing I mean, not building a 42' cruiser.

I mentioned in the previous entry that the instructions say you only need to lash every other beam, but I chose to do all of them for piece of mind. After lashing eleven beams and each end of the kayak, my fingers are a little sore. I'm told the artificial sinew that some people use for lashing, and I'll be using to sew the fabric on, is murder on the fingers, to the extent that a lot of electrical tape is used on fingers to protect them. I've used it before to lace cable runs when I was an apprentice and didn't have a problem with it then. We'll see how I go when it comes time to sew.

The two next pictures show the lashings. Basically you do about four turns in a figure eight pattern as tight as you can without cutting your fingers off, then you do half hitches over that to pull it even tighter. I made a comment the other day about the whole thing exploding in the middle of Moreton Bay. I don't think that'll be happening now that I've got it all tied down.

You can also see in the first picture where the windlass has left a mark in the gunwales. That's not too bad, as it'll mostly be planed out. In future though, I'll use thicker rope for the windlasses and maybe put something under them to protect the wood.


One thing I found while drilling was that, because the Tasmanian Oak I'm using for the beams is harder than the cedar gunwales, drilling into the end grain was quite hard. I think it added a lot of time to the job.

So here's the (almost) finished deck. Yes I know, the lawn needs mowing.


All that remains to be done to the deck is to plane the top of the gunwales and sand the dowels flush. Stringers will be added, running from the masik forward and the back-rest back. They'll be fitted once the hull is done. I tried it out for size before I took it out of the shed and it fits like a pair of gloves, or a tailored pair of trousers. I even pretended to have a paddle in it, which is why I tried it out in the shed and not out in the yard where the neighbours could see me.

The next step, after the planing, is to lash three temporary spacers under the deck and to lash the keelson to that. The stem and stern pieces will then be fitted, before I start on the ribs which will give it its final shape.

Time spent on this part of the job was seven hours, which takes it to twenty four and a half hours total.

Friday, July 22, 2011

Kayak Build, Day 5

Deck beams 5 and 6 are finished. This was actually quite a time consuming job, since they both had to be carved to shape. I'm quite happy with the result, especially beam 6, the masik. Once I'd nailed it in place, I thought I'd better try it for size before I went too far. The instructions say there's 5 1/2" between the bottom of the hull and the gunwales, so I put some blocks underneath and sat on the floor with the frame around me. It's quite uncomfortable sitting on a hard concrete floor with a windlass digging into you belly, but it all seems to fit, so I continued on and made the last deck beam.


That deck beam in the bottom of the next photo is the backrest, so you can imagine how much room I had. The temporary spreader was actually in the way of my legs which made it awkward, but the distance between beam 4, which will be the footrest, and the masik, was just right.

After trying it out for size I sat on the floor for a while, wondering how I was going to get out again without any help.


Once all the beams were in place, it was time to add some more windlasses and start tightening everything up, bit by bit. Every time I put another turn in a windlass there was a creaking sound coming from the boat. It made me wonder if it's really going to hold together once I undo the windlasses, or is it going to explode with me sitting in it in the middle of Moreton Bay. Bits of wood and nylon spread from here to Stradbroke Island.

As you can see from the next two pictures, tightening everything up has put a curve in the deck, as it should.


The gap between the deck beams and the gunwales has closed up too, well, in most places it has. The two forward-most beams have the biggest gaps, but I think they'll be alright.


I've drilled and pegged the masik in place, next job will be to drill and peg all the other beams, then to lash them in place. The instructions say to lash every other beam, unless you're cautious. I'm going to be cautious and lash them all after hearing all that creaking. But that's a job for another day, probably Sunday or Monday.

Time on the job today, four hours, taking the total to seventeen and a half hours.

Thursday, July 21, 2011

Kayak Build, Day 4

I spent some more time on the kayak last night after work while there was nothing on TV. I drilled and pegged both ends so that the glue would be dry if I had time to work on it today.


After dropping Donna off at work I went to Bunnings and bought some more timber for the deck beams. I got two pieces of 42mm x 19mm Tasmanian Oak and a 90mm x 90mm piece of pine for deck beams 5 and 6 which are raised above the height of the gunwales and so need to be thicker. Something 90mm x 36mm would have been better but they didn't have anything suitable, so I figured I could rip this down to size with the circular saw. More about that later.

After picking up my stepdaughter from the airport, I finally got around to picking up the two missing pieces of cedar from the other day, then picked up Donna from work. I finally got to work on the boat around 4:15 once I'd fed the birds. It was supposed to be my turn to cook dinner tonight, looks like I'm down for two nights running in the kitchen now.

The easiest and quickest part of the job today was trimming and sanding the dowels I'd put in last night.


Then came the fiddly bits, measuring out and fitting the deck beams. This is where I managed to cut myself with a chisel trying to tidy up the end of one of the beams. I really should have left a drop of blood on the boat to christen it, but didn't think of it until I'd put the Bandaid on.


After that, I decided to use the circular saw to cut the beams. At least I knew the cuts would always be the right angle and wouldn't need tidying up as much.

So now the boat looks like a funny shaped ladder, although I wouldn't be climbing it just yet. Not only would it fall over, but the deck beams are only nailed in at the moment. Once they're all fitted I'll tighten everything up with windlasses, then peg them all.


At least it looks straight, I'm happy with that. You can see the gaps at the ends of the deck beams, they'll close up once every thing is pulled tight, I hope. The picture below is looking from the back of the boat.


Tomorrow's job will be to shape deck beams 5 and 6. Deck beam 6 is known as the masik, it's used as a knee brace, so it has to be the right height and shape so it doesn't hurt my legs, or get in the way when I'm trying to get in and out of the kayak. If you make the kayak right, you pretty much wear it like a pair of trousers. I don't want it to be one of those pairs of trousers where you have to lay on your back to do up the zip, nor do I want it to be a pair that falls down around your ankles every time you reach up for something.

The pic below shows the last two deck beams. Beam 6 is marked ready for me to cut it tomorrow. Once they're both cut and nailed in, then I can tighten everything up and start pegging. Then the whole thing gets turned upside down and the keel gets fitted. That'll probably be a job for Sunday or Monday, since we're doing a boat license course all day Saturday. No, you don't need a license to paddle a kayak here, we're getting powerboat licenses.


As I said earlier, I figured ripping a 1.2m length of 90mm x 90mm timber would be a cinch with a circular saw. I just put the thing on the saw that keeps the blade an even distance from the edge (can't remember what it's called) and it'll do a nice straight cut. Because the wood is so thick, I'd have to cut one side, then turn it over and do the other side. Next time I do it I'll mark a line along the wood and cut along that instead, because things didn't work out as planned. To make matters worse, I thought that if I did the same on the other side, it'd come out okay anyway. It didn't, the cuts didn't join up properly, as you can see from the last picture.


The other end wasn't as bad, so that's where I cut the material for the two beams. Once I've planed them you wouldn't know I'd stuffed up.

Including the drilling and pegging I did last night, that's another four hours on the job. That's thirteen and a half total. So far I've spent around $150 on materials.

Wednesday, July 20, 2011

Kayak Build, Day 3

Call me impatient, but the 1/4" chisel didn't arrive today, so I found an alternative, a flat bladed screwdriver with a 1/4" blade. You can call me a butcher too if you like. Actually, it worked quite well, I cleaned the mortises up mostly using a 1/2" chisel and used the screwdriver to scrape the rubbish out.


Cutting the mortises was the last thing to be done before the gunwales were seperated. Next step was to chamfer the ends. I started off using the electric planer, but because I was only doing a small area I wasn't really happy with the amount of control I had, even with it set to its lowest blade setting. So, I got out the old Stanley 130 block plane I bought at the boatie's market on Sunday and used it for the first time. I was really pleased with the result and how easy the plane was to use. I wish I'd had it when I built the paddles last week.


Once the ends were done it was time to join them together, well, temporarily to start with. I put a couple of turns of rope around each end, around about where the risers start. Then I cut a temporary spreader to length (more about that later) and wedged it in at the centre line. That was actually quite a scary job, since there's a fair bit of tension on the gunwales. If I'd slipped, there's no telling where the spreader would've ended up. I nailed it in place using the nails I'd previously used to hold the gunwales together. No point throwing away perfectly good, perfectly straight nails just because they've been used for a day or two.

It's now starting to really look boat shaped.


As an added precaution, a windlass was used to keep it all tight.


Next, spreaders were added at the bow and stern. The instructions say the stern one should be 65" from the centre, and the bow one 60" from the centre. There's no way that was going to happen. I think the stern one ended up about 57" from centre and the bow one considerably less than that. When it comes right down to it though, they're only there to shape the boat. As long as the stern is slightly rounder than the bow it'll be okay. After all, when the Inuit were making their kayaks from bits of driftwood they'd found on the beach, I'm sure they weren't too particular about measurements. I'm pretty sure they would have used a screwdriver too if they didn't have a 1/4" chisel handy.

Speaking of measurements, going by the instructions my kayak should be about 21" at the widest point. In fact, I'm so skinny I could probably get away with something even narrower, but then it would start to get a bit too tippy. It wasn't till after I'd attached the bow and stern spreaders that I decided to measure the beam. It turns out to be closer to 23" wide, so it'll probably be even more stable than expected. It'll still be narrower than any other kayak I've paddled, with the possible exception of a Seabird Expedition that I had a quick 5 minute paddle in a few weeks ago.

The last picture shows the bow spreader in place. It looks a little crooked in this picture, but I can assure you it's just the camera angle. I hope.


The last step for the day was to run a saw between the two ends to make sure they fit together nice and flush. Before I did this I couldn't help thinking that the tension on the two sides would squeeze the saw blade once you got part of the way through. I was right. I'm not sure this step is necessary, but if you do go ahead and do it, try to continue all the way through, otherwise if you pull the blade out and start again you'll be removing more wood before the sticking point and you'll find the ends of your gunwales will start to flare out.

Next step is to peg the ends. I'm not sure if I'll get to do that tomorrow as I've got a couple of things to do. I'm picking my step-daughter up from the airport, as she gets back from her Thailand holiday, tomorrow. Then I have to pick up those two missing pieces of timber, and I need to get some more timber for the deck beams. On the plus side, I'm not working tomorrow, so I may get some work done in the evening.

Time on the job today, three and a half hours, that's nine and a half total. Time spent studying, oops. Actually, I'm about two weeks ahead with my reading for uni, but I don't want to get slack and end up two weeks behind.

Tuesday, July 19, 2011

Kayak Build, Day 2

Now that the glue has dried, I've cut the ends to shape. The bow is cut at a 25 degree angle and the stern at 30 degrees, that makes the bow a little more pointy than the stern. That's probably why they call it the pointy end. It's already starting to look boat-shaped.


I trimmed the excess dowel off using a tenon saw. A Japanese pull saw might have been better as it would have allowed me to get in closer and I wouldn't have had to worry about hitting the risers with the spine of the blade. That said, it turned out okay and once the risers were planed using an electric planer it looked quite good, as you can see below. I also planed the side of the risers, since they were slightly thicker than the gunwales.


Next step is cutting the rib mortises, all 44 of them. My original intention was to just cut them all by hand using a 1/4" chisel. Unfortunately, the chisel I bought on eBay hasn't arrived yet, so I figured I'd drill the holes first using the 6mm brad point bit that I'm using for the dowel holes. After drilling about half of them, I decided it'd be a bit quicker if I marked out where the holes were to go using a nail first. Trying to line the drill up with the centre of the mortise is awkward when the bit is obscuring your view of the markings, especially if you marked out using a mortise gauge like I did. A brad awl would have been easier on my hands, but the nail worked fine.

I picked the best holes I could find to photograph my drilling, just to make it look like I'm a better craftsman than I really am. I must say, my woodworking skills are really improving as I progress.


So, 132 holes later, all I need to do now is clean them up when my 1/4" chisel arrives. I tidied them up a bit lengthways using a 3/4" chisel. The mortises are actually 1" long, but I decided not to use the 1" chisel, since my marking wasn't perfect and not all of them were the full 1". The ribs will only be 3/4" wide anyway, the reason for making the mortises longer is to give you a bit of room to get the ribs in when you're fitting them.


The last step for today was to mark out the ends where they need to be chamfered. Once the nails are removed and the deck beams are fitted the ends need to fit together flush, so the area inside the 'V' in the picture below will be removed using a plane.


All up, I spent two hours working on it today. Yesterday I spent four hours. A common question is, how long does it take to build a kayak, so I'm trying to keep tabs on how much time I spend each day. I also need to make sure I don't spend too much time on it, since I'm studying part-time for a science degree and I need to make sure I devote enough time for that.

Hopefully, my chisel will arrive tomorrow and I'll be able to continue. Oh, and I got onto my timber supplier, they were very apologetic and they're cutting the other two pieces for me today.